Search This Blog

Showing posts with label Windows 7. Show all posts

Thursday, November 20, 2014

Creating and installing Windows Service in a development enviroment.

I hadn't worked on a Windows Service in 4 years so I forgot some of the fun necessary to create a new Windows Service.

Useful References
SC.exe - http://technet.microsoft.com/en-us/library/cc754599.aspx

Using SC.exe 

Settings Description for Service:


Steps to create a new Windows service
(Using Windows 7 Pro and Visual Studio 2013 Ultimate)

  • Add new project to solution
  • Select C# Windows, Windows Service template
  • Name project SoftwareUpdaterService and create.
      Note: VS 2013 template creates the necessary service base code to be a functional service:

     public Service1()
        {
            InitializeComponent();
        }

        protected override void OnStart(string[] args)
        {
        }

        protected override void OnStop()
        {
        }


  •  Build project and confirmed ..\SoftwareUpdaterService\bin\Debug\ SoftwareUpdaterService.exe
  • (I forgot this step) use SC to install the service
  • Open VS 2013 command prompt, switch to  bin\debug folder
  • Run this command:
SC create MergeSoftwareUpdater displayname= "Merge Healthcare Software Updater Service" binpath= "C:\CAP30\Tools\Software Updater Service\SoftwareUpdater\SoftwareUpdaterService\bin\Debug\SoftwareUpdaterService.exe" start= auto


  Creates registry entry for service:
HKEY_LOCAL_MACHINE\System\CurrentControlSet\Services

MergeSoftwareUpdater <= service key.


  • Open Services manager and service should appear.
  • Added Installer class to service project (lifted it from an existing project)
  • Now InstallUtil.exe will install the project as a service.
     InstallUtil.exe SoftwareUpdaterService.exe
(Added) using System.Net;
              using System.ServiceProcess;
        private void InitializeComponent()
        {
            this.serviceProcessInstaller = new System.ServiceProcess.ServiceProcessInstaller();
            this.serviceInstaller = new System.ServiceProcess.ServiceInstaller();
            // 
            // deliveryServiceProcessInstaller
            // 
            this.serviceProcessInstaller.Password = null;
            this.serviceProcessInstaller.Username = null;
            // 
            // deliveryServiceInstaller
            // 
            this.serviceInstaller.ServiceName = "Merge Healthcare Software Updater Service";
            this.serviceInstaller.Description = "Allows software updates to be scheduled and run automatically.";
            this.serviceInstaller.StartType = System.ServiceProcess.ServiceStartMode.Automatic;
            // 
            // ProjectInstaller
            // 
            this.Installers.AddRange(new System.Configuration.Install.Installer[] {
                                                                                      this.serviceProcessInstaller,
                                                                                      this.serviceInstaller});
        }

        public override void Install(IDictionary stateSaver) 
        {                    
            if (Context.Parameters["user"] != null && Context.Parameters["user"].Length != 0 && Context.Parameters["password"].Length != 0 && Context.Parameters["password"] != null) 
            {
                string user = Context.Parameters["user"];
                // if the user starts with . then we want to replace that with the local machine's actual hostname
                if (user.StartsWith(".")) 
                {
                    user = Dns.GetHostName() + user.Substring(1, user.Length - 1);
                }
                serviceProcessInstaller.Username = user;
                serviceProcessInstaller.Password = Context.Parameters["password"];
                serviceProcessInstaller.Account = ServiceAccount.User;
            } 
            else 
            {
                serviceProcessInstaller.Account = ServiceAccount.LocalSystem;
            }
            
            base.Install(stateSaver);
        }


Wednesday, February 20, 2013

Simple file list from a folder structure

Another thing I can't seem to remember.

Source:  http://smallbusiness.chron.com/copy-list-files-windows-folder-excel-list-40032.html


Step 1

Press "Win-E" to open Windows Explorer and locate the folder for which you need a file list.

Step 2

Hold the "Shift" key, right-click the folder and select "Open Command Window Here."

Step 3

Type "dir /b > dirlist.txt" without quotes and press "Enter." This creates a list containing file names only. To include file sizes and dates, type "dir > dirlist.txt" instead. To also include files in sub-directories, type "dir /b /s > dirlist.txt" to create a list of files with the full directory structure name, such as "C:\folder\subdirectory\file.txt.


Monday, July 9, 2012

Displaying a public key for an assembly.

This was way harder that it needs to be....

Use sn.exe with -Tp argument.  However,  to make this useful instead of just seeing it in cmd windows,
Follow the steps in this article: http://goo.gl/lFx1B

Use the following path for sn.exe:

For me on a Windows 7 64-bit using VS2010, the path to sn.exe was C:\Program Files (x86)\Microsoft SDKs\Windows\v7.0A\Bin\sn.exe

Related stackoverflow link :http://stackoverflow.com/a/1123831/44597

Did this so I could attempt to unit test a MVC application that is strongly signed.


ASP.NET MVC - How to Unit Test an Action Method which returns JsonResult?


WebPart Tip: How to quickly view the public key for an assembly in the output window

I saw this handy little helper function being used on a MOSS screencast by Todd Bleeker and decided to figure out how he did it :). Basically it allows you to view the public key token of an assembly from within Visual Studio's output window, which saves time when you need to grab the key for use with the safe control entries in the web.config for example.
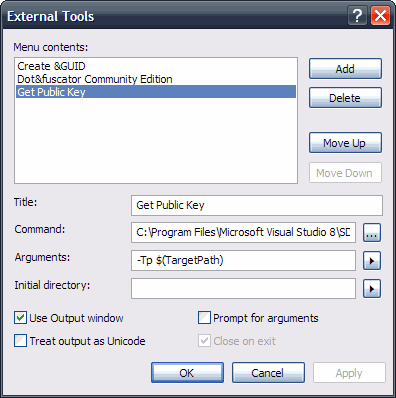
First step, fire up your copy of Visual Studio 2005 and open up a webpart class library project. Then from the Tools menu select External Tools. This will bring up the following dialog:
 
From the options, click Add and then give your utility a title. Now all we're doing here is essentially grabbing the output from the sn.exe command, so you will need to provide the path to your local sn.exe file. Mine was located in the following folder:
C:\Program Files\Microsoft Visual Studio 8\SDK\v2.0\Bin\sn.exe 
Now, just like if we were running the strong name utility from the command line, we're going to need to pass in the correct arguments. Firstly we'll need to pass the -Tp argument, as we want to get the token for the public key, together with the public key itself. Then we need to specify the target assembly, which can be done by clicking on the button to the right of the Arguments field and selecting 'Target Path'. This basically gets the full qualified path to item which is being built, in our case a webpart assembly. Lastly just tick the 'Use Output Window' checkbox and then click ok and you're good to go :)
The new utility you've just created should now show up in the Tools menu, you can go ahead and click it and you should now see the output window popup with the details of the public key. This is a really nice feature of Visual Studio and I'm sure this can be tailored for many other uses.

Monday, February 20, 2012

Windows 7 Activation Problems.

I've been struggling with Windows 7 license issues.  After hard drive changes (not the boot drive), one of my test machines keeps have the Windows 7 Pro license invalidated.  This is odd since I thought I had a real license key for the machine and not one of those tech-net, it expires in a year licenses but I'm not really sure anymore.

My solution was to purchase a discounted license from a non-Microsoft website whose claimed to be a Genuine MS Partner.  Initially the key I received did not work but I used the following steps and I was able to activate Windows 7 Pro using automated phone registry.

From http://social.microsoft.com/Forums/en-US/genuinewindows7/thread/dd8f477a-07a7-42b5-b5bb-5079a5fd8140


First off, try these alternate steps to change the product key
1)    Click the Start button
2)    Type: slui.exe 3 and hit the Enter key
3)    Type in the Product key from the sticker on your computer
4)    Click the Next button.
5)    You will be asked if want to Activate, click ok
6)    It will attempt to Activate by the internet and will return an Invalid Key error (this is ok, continue to step 7)
7)    Click the Start button
8)    Type: slui.exe 4 and hit the Enter key
9)    Select your location in the drop down menu and click the Next button
10) The next screen provides the number to call to Activate by Phone
If that doesn't work, try these steps that will recreate Windows 7's Licensing Store.  When it recreates the file, Windows will need to repopulate it with Licensing Information so will ask you to enter the Product Key and to Activate (use the Activate by Phone method)
1) Open an Internet Browser
2) Type %windir%\system32 into the browser address bar.
3) Find the file CMD.exe
4) Right-Click on CMD.exe and select 'Run as Administrator'
5) Type: net stop sppsvc  (it may ask you if you are sure, select yes)
6) Type: cd %windir%\ServiceProfiles\NetworkService\AppData\Roaming\Microsoft\SoftwareProtectionPlatform
7) Type: rename tokens.dat tokens.bar
8) Type: slui
9) After a couple of seconds Windows Activation dialog will appear. You may be asked to re-activate and/or re-enter your product key.


Lastly, if neither set of steps resolves the problem, download and run the Genuine Diagnostics tool (MGADiag.exe) at this linkhttp://go.microsoft.com/fwlink/?linkid=52012. Click "Continue", click the "Copy" button then “Paste” the report into a reply message in this thread.

Wednesday, February 9, 2011

VB6 Manifest File Follow-Up

Okay, it turns out following the advice in the previous post can produce a valid Windows 7.  Turns the problem was my version number in the manifest file did not match the actual version of the App.exe.  (Stupid stupid mistake).

So here is the manifest file I created. It was too much trouble to convert my manifest file (being XML to something that I can display in blogger, File is Manifest.txt in my BlogFiles folder on skydrive.

Thursday, January 27, 2011

My quest for Windows 7 manifest file for a VB6 exe

So, I am currently running a common problem trying to deploy a Vb6 application written and developed for Windows 2000/XP into the Vista/Win2008/Windows 7 world.

Problems
#1 - User Access Control - I get prompted by Windows about I do not know anything about this program are you sure you want to allow this.

#2 - Run as Administrator requirement:  Under compatibility for the Application short-cut, enabling run as Admin.  Turns out my project is creating and storing session and user in Program Files\App Folder\ in sub folders.  Which is being discouraged by Microsoft in Windows 7.

Possible Solutions:
#1 - On workstation after deployment, Run application with Run as Adminstrator turned on.
        This is an okay workaround but requires every workstation to be touched.
#2 - Use on a manifest file to set the execution permission to Administrator
        Alots and alots of discussions on the web and StackoverFlow.
        Found this gem Manifest creation tool - http://www.vbforums.com/showthread.php?t=606736
      
        Downloaded it.  I was able to create an apparently correct manifest file but  it did not work.
        Still trying to find out why.  
        Related post - http://stackoverflow.com/questions/4489165/vb6-manifest-not-working-on-windows-7/4496389#4496389

 My question if any wants to answer it and earn big big karma points....
What is the best solution to force a VB6 application to run as Administrator premissions
    - Is it really possible for VB6 and Windows 7?
    - Is the problem with session data in ..\Program Files\My App\  really the whole issue?
  
Any advice will be welcomed.  Email: gary.Kindel@gmail.com

Thanks